Paleo Samoa Bars

Make the Crust:
1/3 cup coconut flour
1/2 cup unsweetened small grate coconut
1/4 cup ground up pork rinds (measured after grindning)
1 egg
3/8 c. coconut oil
1 Tbsp erythritol or maple syrup

Obliterate all of your crust ingredients in a high powered blender or food processor. Line a 10×15 with parchment and dump out sand-like crust batter. Push down to an even-ish 1/3 inch (It may not fill the entire pan, think free form, almost filling it) and bake in a preheated oven for approximately 10-12 minutes. (at 350). After it bakes let it cool slightly and then refrigerate /freeze the crust to make it easier to add the filling. Do NOT remove it from the pan, until it is chilled it will be crumbly…

Make the Topping – This is where the magic happens!
13 medjool dates, pits removed
3 Tbsp hot water
3 Tbsp coconut oil
1/2 Tbsp raw caco
1/2 cup flaked coconut

Add dates, water and coconut oil to a high speed blender or food processor. (I use a Vitamix.) Blend until pasty and relatively smooth. Add cacao and coconut and blend for another few seconds until everything is combined. (Taste test and be transported to the world of Girl Scouts peddling gluten and junk laden cookies, seriously).

Once your crust is chilled, simply spread the filling evenly on the crust. Be gentle and use your hands to pre-smash some of the filling before you lay it on, the crust may still flake slightly.

Return to the fridge and make chocolate sauce.

Chocolate Sauce
1/3 c. coconut oil
3 Tbsp maple syrup
1/3 c. Raw cacao powder (or dark cocoa)
1 tbsp carob powder – optional or add an addl tbsp cacao, omit if using cocoa.
1 t. vanilla extract (I like to make my own)
pinch of sea salt

Melt coconut oil and syrup gently over med-low heat. Add cacao and carob and whisk to combine. Once it looks like chocolate, add the vanilla and salt and stir again. Drizzle over topping on bars and return them to fridge. (Store in the fridge or freezer).
Divine…

Cashew Butter Chocolate Chip Cookies

3/8 cup palm oil shortening (or 1/4 c+1tsp coconut oil)
3/4 cup cashew butter (ideally soaked for 4 hours before blending)
1 egg
2 tbsp maple syrup
1/4 cup coconut sugar
2 tsp vanilla extract
3 Tbsp coconut flour
1/2 tsp baking soda
1/4 cup enjoy life chunks
1/4 cup enjoy life mini chips

Blend all the wet ingredients until creamed. Add coconut flour and baking soda. Mix until well combined. Blend in the chips. Scoop by rounded tablespoon onto baking sheet.

Bake at 350 for 9-11 minutes.

Sugar Free Slice and Bake Sugar Cookies (dairy free, nut free, egg free, gluten free)

Sugar Free Sugar Cookies (lowcarb, gluten free, dairy free, egg free, nut free)

Solid cookies that hold together, look pretty and come together in a snap.

Oh my…pretty psyched for these. With the list of everything NOT in them…you’d think they were made of air. They’re not though…but they have a great shortbread texture with a pretty traditional sugar cookie flavor. Delicous!

Slice and Bake Sugar Cookies (dairy free, nut free, gluten free, egg free, low carb)
Makes 11-13 cookies, depending on your rolling

1/2 cup melted coconut butter
1/2 cup melted coconut oil (refined for a less coconutty taste)
1/3 cup Erythritol
1/2 tsp English Toffee Liquid Stevia
1/4 tsp Better Stevia Glycerite
1 ripe banana
1/2 cup coconut flour
1 tsp Great Lakes Unflavored Beef Gelatin – red can
pinch of sea salt

Blend all ingredients except coconut flour and the gelatin using a hand mixer. Sprinkle the gelatin evenly across the batter and mix again. Sift in the coconut flour and mix well.

Allow dough to sit for approximately 10 minutes.

Roll into a log in parchment paper. Using a sharp knife, cut into 1/2 inch cookies, place on a parchment lined cookie sheet, add dye free sprinkles, should you so choose, and bake for approximately 16-18 minutes, or until sides and bottoms turn golden brown.

Allow to cool completely on pan and then for best texture, refrigerate overnight.

Raw Mini Carrot Cakes (paleo, nut free gluten free, dairy free, AIP compliant)

Mini Raw (Nut Free) Paleo Carrot Cakes

Raw Mini Carrot Cakes (paleo, nut free gluten free, dairy free, AIP compliant)

Mmmm…I love love love love carrot cake. What I don’t love is the amount of time it takes to make them and the amount of nuts used in almost every single gluten free carrot cake recipe on the web. When I found a raw carrot cake recipe, I thought I could play around with it to omit the nuts, and make it AIP compliant. I did…and holy canoli, this one was a hit – with my gluten free people as well as my not-so-health-concerned friends!

Here’s my inspiration for this one…http://paleogrubs.com/gluten-free-carrot-cake-bites

AIP Compliant Raw Carrot CakesFor the cakes:
10 medjool dates, pitted
1 pound shredded carrots
1 cup roasted plantain chips (no canola oil….don’t forget)
3/4 cup coconut flakes
1 1/2 TBSP coconut oil
1 tsp cinnamon
1/4 tsp ginger
1/4 tsp cloves
1/4 tsp mace (or nutmeg if not AIP)

For the Cinnamon Frosting:
3/4 cup Red Palm Shortening
1/3 cup maple syrup
1/2 Tbsp coconut flour
1 tsp vanilla (optional, omit for AIP)
2 Tbsp arrowroot powder
1/2 tsp cinnamon
tiny pinch of sea salt
20 drops of English Toffee Liquid Stevia– optional (omit for AIP)

To make the cakes, blend everything except the carrots in the food processor until well combined. Add the carrots and pulse until everything is blended and chopped nicely. Spoon out into lined muffin tin. Make sure to press down so that they will hold together.

To make the frosting, dump everything in a bowl and use a hand mixer to blend well. Transfer to a piping bag, scratch that (who are we kidding here) a ziplock baggy, cut an edge with good scissors and pipe the frosting in circles to look pretty. You should have extra frosting, no judgement if you pipe it into your mouth…

Refrigerate for at least an hour to allow the cakes to set up, but overnight works too.

Cucumber Apple Jicama Salad

Cucumber Apple Jicama Salad | Easy and delicious for summer potlucks and picnics

This is an amazing salad for summer. It comes together in a flash and everyone LOVES it…seriously, people are wary when you tell them it’s a cucumber apple salad, then they taste it and go back for seconds! To make it lower carb, you could easily sub the honey for a xylitol honey or even a few drops of stevia. You could also decrease the apple by 1 and increase the jicama.

Alright Dinner’s Done people…you asked for it, and here it is 🙂 Enjoy!

Cucumber Apple Jicama Salad | Easy and delicious for summer potlucks and picnics

Cucumber Apple Jicama Salad pairs perfectly with grilled chicken, burgers or anything else on your summer menu

Cucumber Apple Jicama Salad
Serves 6-8

Salad
2 normal cucumbers (or 1 English)
2-3 large crunchy apples (Granny Smith, Gala, Fuji)
½ large jicama (approx. 1 lb)
1 medium sweet onion (yellow or red)

Dressing
4 Tbsp Extra Virgin Olive Oil
4 Tbsp Apple Cider Vinegar
1 ½ Tbsp Honey
2 Tbsp Dijon mustard (optional)
1 clove garlic
3 Tbsp fresh basil
2 Tbsp fresh Italian parsley
½ tsp sea salt

Make dressing by combining all ingredients in a food processor or blender until smooth.

Make salad:
Core and slice the apple thinly, leaving skin on for color and texture. (I use the slicing blade on the food processer) Pour a small amount of dressing over the apples and toss to coat so that they don’t brown while you prepare the remaining ingredients.

Peel cucumber and slice in half lengthwise to allow you to scoop out the seeds. Slice into thin half moons. (Again, I use the slicing blade, but have also had success with a mandolin or just a thin cut.)

Peel the jicama and slice it to the same thickness as the other ingredients. I like to use a matchstick cut, after slicing it thinly.

Slice onion super thin (slicing blade works like a charm).

Add all fruits and veggies to a bowl. Pour dressing over and mix well.

Tastes better after sitting for at least 4 hours, but even better overnight! Enjoy!

Sugar Free, Dairy Free Hot Cocoa

The perfect holiday breakfast treat...sugar free hot cocoa and coconut pancakes

The perfect holiday breakfast treat…sugar free hot cocoa and coconut pancakes

2 cans full fat coconut milk
1-2 cans water (depends on how thick you like it)
1/3 cup raw cacao
1/3 cup dark cocoa
3/4 – 1 tsp English toffee stevia
pinch salt
1/4 cup coconut oil
3 Tbsp collagen hydrosolate

Thick and rich, without a blood sugar crash 20 minutes after drinking it. This is a drink I feel good letting my kids drink every day!

Heat the coconut milk and water in a saucepan (or the microwave) and then blend well, ideally in a high-powered blender until all mixed well.

Makes almost 1/2 gallon. Stores for up to 2 weeks in the fridge, simply reheat whenever you want a cup. Easy peasy!

Chocolate {chicken} Truffles (lowcarb, keto, sugar-free)

photo: chicken chocolate truffles

Truffles with erythritol coating

Sooo, let me give you some background because this sounds crazy, I know. Chicken breasts and mozzarella make a mackdaddy chicken parm casserole, but chocolate truffles, seriously?!?! I know. Please don’t stop reading now. These are really good, and the brain child of chicken pizza crust, which I was eating cold, and noticed that the crust had the texture of a great brownie. I mulled it over for a few weeks, trying to convince myself that it wouldn’t work, but I HAD to try it. I did…and it worked. Like for real, I made truffles out of chicken. Yes. Mind blown.

That said, if you have less adventurous diners in your house, don’t tell them, even after they try them. There’s just something that seems very wrong about chicken chocolate truffles to some people. My husband is in that camp…and I made the mistake of thinking he would be openminded. Wah wah. Oh well, more for me!

6 oz chicken breast (1 small), baked with no seasoning, at 425 for 25 minutes
2.5 ounces mozzarella
1 egg yolk
3 Tbsp dark cocoa
3 Tbsp raw cacao
1/3 cup erythritol
½ tsp English toffee stevia
2 Tbsp butter or coconut oil

LC Chicken Chocolate Truffles

Look at those bite marks…smooth and chewy!

Bake chicken breast at 425 for 25 minutes. While chicken is cooking, cube the mozzarella and get everything else ready. Once the chicken is cooked thru, carefully cube it so that you can drop it in your high powered blender, while still hot.

Drop in chicken pieces, into running blender, one at a time, until thoroughly pureed. Add the cheese, one piece at a time to the chicken. It should make a pasty like dough. Add remaining ingredients and blend well, using the tamper to ensure everything is well mixed. Taste dough. Add additional sweetener if desired.

Allow to cool slightly until it’s not quite as sticky and will hold a shape. Roll into 1 inch balls and refrigerate until set. Before serving, roll in erythritol or shredded coconut if desired.

Gluten Free Oatmeal Cream Pies

Gluten Free Oatmeal Cream Pie Cookies

Gluten Free Oatmeal Cream Pie Cookies
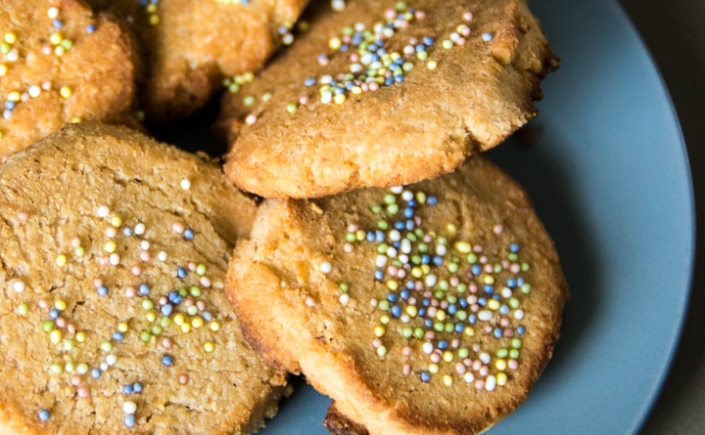
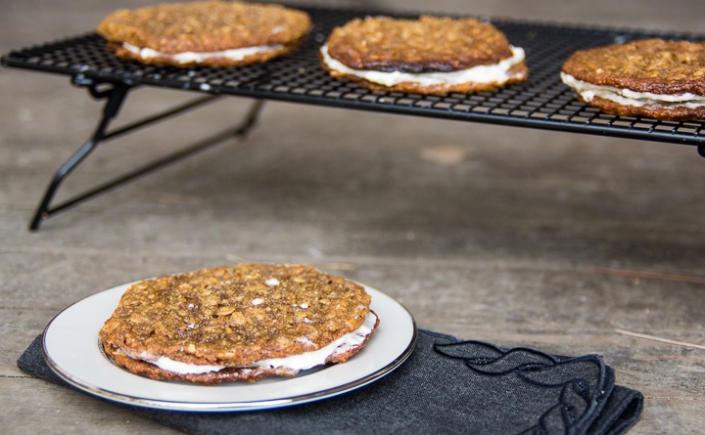
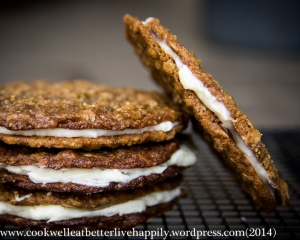
OMG. Stop what you are doing and go get the stuff to make these. Make them and your life will change…for the better, for the worse, your call. Depends on if you are trying to lose weight. If you are, I take back my recommendation. Just move on to another blog post. Because these are not healthy. I repeat…These. Are. NOT! Healthy. They are, however, gluten free and (I just died and went to dessert heaven) freakin’ delicious.

A little background, since this recipe doesn’t exactly fit with most of what’s on this blog…So, here’s the story. In case you were unaware, I typically follow a lowcarb, ketogenic and grain-free way of eating (or WOE if you spend lots of time on the internet…who comes up with this shit?!?!). I am also gluten free because of a gluten intolerance. I eat this way because it makes me feel the best and allows me to maintain a healthy weight. I sleep better when I avoid carbs and sugar, I’m happier and have more energy. But, I do allow myself treats, usually ice cream. Man, I’m a sucker for ice cream. Maybe once a week, usually when we’re out with the kiddos.  The only thing I don’t ever cheat is the gluten…because I know that doing so will result in debilitating cramps in the middle of the night for at least 2 nights following the ingestion.

My husband and kiddos are also gluten free and eat minimal sugar, since I do all the cooking and most of our treats are for the whole family, myself included. I use a lot of coconut flour, stevia, erythritol and protein powders. I have also begun experimenting with raw pumpkin seed flour, since both myself and my oldest kiddo have issues with almonds. My youngest has sensory issues so I spend a lot of time trying to create recipes that will nourish a picky 2 year old who only eats brown food that is “not gooey”. I have gotten as creative as adding chicken livers to muffin batters, spaghetti squash in cupcakes and just about every other “sneaky chef” way to make sure he is eating a relatively well-balanced diet that really only consists of variations of waffles, pizza crust, pancakes, muffins, etc. We have recently branched into being ok with fruit chips, and in working with an OT we are definitely making progress, but it’s a challenge. Every. Single. Day.

That said, there are some areas where my kids and husbands take a little more leeway than I can allow myself. As a “super special” treat, my oldest will have gluten free oatmeal for breakfast a couple times a month. My kiddos eat ice cream a few nights a week, and they also eat a good bit of fruit. When we are out or at parties, as long as it is gluten free, we’re pretty lax about what they eat, because I know that 90% of the time at home they are getting what they need and I’d rather them have a little sugar now than feel deprived and go off the rails when they have the chance away from us.

Anywho, about a week ago, this recipe popped up in my pinterest feed. It looked amazing. I checked it and completely missed the white flour portion and thought…hmmm, it’s gluten free, I can make this as a special treat. I had some time during nap earlier this week and had picked up powdered sugar to make my oldest son’s birthday cake frosting (like I said, not purists…I just can’t even remember the last time I bought powdered sugar!). I pulled up the recipe and re-read it, realizing that it wasn’t gluten free. Crap. Figured I’d play with it, and I did. Holy crap. These things are so freakin’ good. Like I said before…this recipe may ruin you. Consider yourself warned. Let me know what you think…

Brown Sugar Oatmeal Cookies (Gluten free…)

1 cup butter, softened
¼ cup coconut oil
1½ cups dark brown sugar
1 large egg
1 Tbsp vanilla (optional)
1 ½ cup pumpkin seed flour (or almond meal)*
1/3 cup packed coconut flour
1 tsp baking soda
½ tsp Kosher salt
1 tsp cinnamon
½ tsp nutmeg
2 cups gluten free oats*

Heat oven to 375

Make the Cookies
Cream butter, oil and sugar. Add vanilla and egg and beat. Add remaining ingrediants except oats. Mix well with a hand mixer. Add oats and mix again. (If you add the oats early, the batter will be very thick and hard to get thoroughly combined.

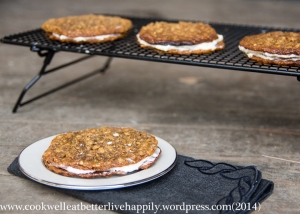
Roll into larger balls (approximately 2 inches) and leave lots of space, these things spread like crazy. I got about 8 on a parchment lined (important, line with parchment) cookie sheet.

Bake at 375 for 10 minutes. Edges should be crisp and the middle will look un-done. (Really, you’ll think you should cook them more, but you shouldn’t if you want them to be soft like Little Debbie’s) Remove from oven and allow to cool on cookie sheet for 10 minutes. If you remove them early, they will disintegrate. Before they cool, you can use a spatula to separate and round them out, they are very pliable, just kind of push them into submission.

While cookies are baking, make the cream filling
Cream Filling
¾ cup butter, softened
3 cups powdered sugar
¼ cup sour cream
1 vanilla bean

Cream butter. Add powdered sugar and mix until combined. Add sour cream and inside of the vanilla bean (you could sub 1-2 tsp of real liquid vanilla, but the bean is better). Mix well until combined.

Add 1 tbsp of filling to each pair of cookies and sandwich together. Eat. Share…or not, I won’t tell.

Store in the fridge (or the freezer). Cookies will set up better after about an hour in the fridge.

Gluten Free Oatmeal Cream Pie Cookies*For a crisper cookie, more cookie than “Little Debbie” style, you can increase the oats to 3 cups and decrease the pumpkin/almond meal to 3/4 cups. Follow all the directions, just make sure the middles look done when you pull them out.

NOTE:
I plan to try these in a parchment lined muffin pan next time to make them a little smaller and thicker, as that would prevent the spread.

Keto Pumpkin Pie and Flakey {Grain Free, Low Carb} Crust

Keto Pumpkin Pie

Keto Pumpkin PieThis is sooo good. And so easy. I was always an apple pie girl, most of my family was. Although we would make the obligatory pumpkin pie at the holidays, the apple was always the first to be eaten, meaning that we made 2 and they were still eaten more quickly than the pumpkin. Pumpkin was good, but seriously couldn’t hold a candle to warm apple pie and ice cream. This was true for all of my 30 years, until this recipe.  This combines the deliciousness of pumpkin, with the creaminess of cheesecake, without being cheese-cakey. Sooo good warm out of the oven with freshly whipped cream, soooo good reheated the next day, or even eaten cold with leftover cream. Yummmmm!

Why do we wait for the holidays for pie? I have decided that I won’t any longer, especially since this comes together in a snap, crust included (no rolling!). Speaking of crust…This. One. Is. IT! Look no further and never try to fool yourself into thinking that almonds, butter and splenda/stevia = a pie crust. It doesn’t people…I promise. Don’t question it, don’t try to substitute it, just make it. And smile. And remember back in the day when pie was so freakin’ good!

Crust:
1/2 c. coconut flour
1/4 c. unsweetened (small) grated coconut/flakes
1/4 c. ground up pork rinds (measured after grinding)
1 egg
6 Tbsp butter, melted
1 Tbsp erythritol

Mix all of your crust ingredients in a small bowl with your hands. It will be sandy. Line your pie plate with parchment (you can skip this if you are planning on serving warm, but once it is refrigerated, it becomes pretty challenging to get all the crust out). Dump your mixed crust ingredients into the pie plate and use your fingers and hands to pat it out and up the sides. I use a deep dish, Pampered Chef stone pie plate and it goes all the way up the sides, but not over the sides. It should be about 1/4 inch thick.

Put your crust in the fridge while you make the filling.

Pie Filling:
1 can pumpkin
8 oz melted Neufetchal {cream} cheese
1/2 cup heavy whipping cream
2 eggs
2 egg yolks
1 tsp cinnamon
1/2 tsp nutmeg
1/4 tsp cloves
1/4 tsp ginger
1/2 tsp salt
1/2 cup erythritol
1/2 tsp english toffee stevia

Combine all of your ingredients in a blender. (I use my Vitamix, which I LOVE), but as long as everything is melted, any standard blender should work. (I’m guessing a hand-mixer would probably be sufficient as well, but I can’t guarantee that. If you go that route, mix all the wet / melted ingredients first and then add the cold stuff and spices.)

Pour filling into your chilled crust and bake at 350 for 45-60 minutes or until set in the middle. Remove from oven and allow to cool for 30 minutes before serving. It doesn’t cut as nicely warm, but it’s super delicious! ENJOY!!

This crust is also phenomenal with apple pie, preferably with lower sugar, fermented apples. Thank you to Ginny over at Ginny’s Low Carb Kitchen for inspiring me to try that. My filling isn’t just right yet, but it’s coming. Just double it for a double crusted pie.

Keto pumpkin pie, low carb, gluten and grain free, whipped cream

The result of waiting until the 2nd day to photograph with fallen whipped cream…Still yummy though 🙂


Cocoa Chicken and Artichokes

Easy one dish chicken dinner, full of flavor and perfect for hectic school week nights.

Cocoa Chicken with Artichokes and Tomatoes…40 minutes to dinner on the table!

Sooo, I’m a big fan of marinating chicken breasts. I have some serious issues with dry, flavorless chicken and refuse to put that on my family’s table. Most of the time, my solution is a good marinade, however, sometimes I don’t have time or energy to marinate all the chicken breasts I buy on sale, and it ends up in it’s original packaging in my deep freezer. (Not often, but sometimes…) Then, sometimes, I forget to take out my meat far enough in advance to defrost and marinate it for dinner that night…like a few nights ago. I had chicken that was defrosted in my fridge, but it was plain.

What to do? Check Pinterest of course. I had pinned this Italian Chicken recipe awhile ago, and it looked pretty easy, but not exactly what I was going for, with all the cheese and such. Enter…Cocoa Chicken. Why I decided to add raw cacao to my chicken dish, I don’t know…but dang it was good. Really good, like my husband was clamoring for the leftovers good! (That’s the way I know a dish is really good). My 3 year old also really enjoyed the chicken (not so much the artichokes or tomatoes, but that’s ok) portion of this dish.

I’ll totally be making this again, as it was about 5 minutes of hands on time and only about 35 minutes in the oven!

2 lbs chicken breast, cut into 1-2 inch pieces
1 can of quartered artichokes (unseasoned)
1 pint cherry tomatos
1/2 large onion, sliced thin
1/2 cup dry white wine
3.5 Tbsp butter, cut into 7-8 pats
1 Tbsp Coconut Flour
1 Tbsp Raw Cacao Powder (or unsweetened cocoa)
Salt, pepper, oregano, garlic powder

In a 9×13 baking dish (I love my pampered chef stoneware) add the chicken – salt and pepper it liberally and mix with your hands. Top chicken with the artichokes, tomatoes and onions. Sprinkle all with salt and pepper, garlic powder and oregano. (Just sprinkle liberally.)
Pour wine over.
Sift cacao and coconut flour over everything and stir a bit to coat everything.
Space pats of butter on top of everything.

Roast at 375 for 30-35 minutes or until chicken is cooked thru.

Serve over rice, mashed potatoes, or mashed cauliflower, if desired.